


Did you know 93% of people look at visuals first when buying something new? This shows how important your images are today. High-quality visuals do more than just show an item; they tell a story.
Using product photography tools boosts how people see my work. These small additions add context and show the value of what I offer. It’s all about creating a mood that feels both professional and welcoming.
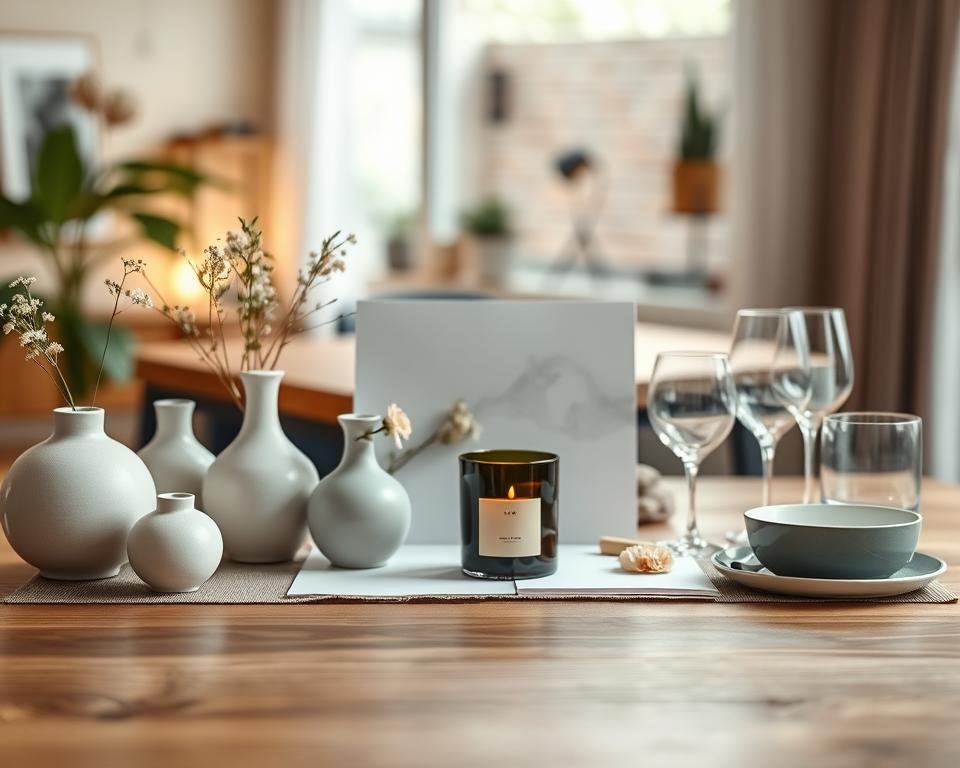
I love how styling props can make a flat image come alive. Visual storytelling is key to standing out online. By picking the right elements, I can direct the viewer’s eye exactly where it should go.
Key Takeaways
- Visual appearance influences 93% of purchasing decisions.
- Strategic additions help create a compelling brand narrative.
- Professional tools add necessary depth and texture to shots.
- Great imagery builds trust and helps customers visualize ownership.
- Small elements guide the viewer’s focus to key features.
- Engaging photos are essential for standing out in the digital market.
Why Product Styling Props Matter
Using the right props in product styling can make your products look more appealing. This makes them more relatable and attractive to your audience. In the world of product photography, photography propsandprop stylingare key. They help tell a story that speaks to your customers.
Good props can turn your product photos into lifestyle images. This is important in today’s market. People are buying experiences and identities, not just products.
The Impact of Visual Appeal
The first thing that grabs a customer’s attention is how a product looks. Product styling props enhance this by adding context and depth. For example, using wood or plants can make your photos feel warmer and more authentic.
Creating a Connection with Your Audience
Product styling props also help create an emotional bond with your audience. By choosing props that match your audience’s lifestyle, you make your product more relatable. This bond is essential for building loyalty and driving sales.
Enhancing Brand Identity
Brand identity is where props really shine. Using specific props consistently can make your products instantly recognizable. This consistency is vital for a strong brand identity that stands out.
| Prop Styling Element | Impact on Brand Identity | Example |
|---|---|---|
| Natural Elements | Adds warmth and authenticity | Using wooden props for eco-friendly products |
| Textiles and Fabrics | Creates a sense of luxury or comfort | Using velvet backdrops for high-end jewelry |
| Functional Props | Demonstrates product usage or benefits | Using a coffee cup with a coffee maker |
Selecting the Right Styling Props
The art of product styling is about picking props that match your product’s look. When I style my products, I think about the story I want to tell. It’s more than just placing a product; it’s about creating a vibe that speaks to my audience.
First, knowing your product’s style is key. This means figuring out its color, texture, and design. For example, minimalist jewelry might have simple designs and a calm color scheme.
Understanding Your Product’s Aesthetic
When I dive into my product’s style, I look at its core features. I choose props that match its texture or color to create a unified look. For instance, if my product has a natural look, I might pick props like wood or stone.
Here’s a quick guide to understanding your product’s style:
| Product Feature | Aesthetic Element | Prop Suggestion |
|---|---|---|
| Minimalist Design | Simple, Clean Lines | Simple geometric shapes, neutral backgrounds |
| Earth Tones | Natural Colors | Wooden props, stone elements |
| Vibrant Colors | Bold, Bright Hues | Colorful textiles, playful accessories |
Matching Props to Your Target Audience
Choosing props that match your audience is just as important. I think about my ideal customer’s age, interests, and tastes. For example, if my audience loves the environment, I might use eco-friendly props.
By picking props that fit your product and audience, you can make displays that look great and connect with your customers. This way, your displays will not only be eye-catching but also meaningful to your audience.
Types of Product Styling Props
Product styling props are key in making product photos pop. They add depth and context to your images. Knowing the different types of props helps you choose the best ones to make your product look great.
Natural Elements: Wood, Stone, and Plants
Wood, stone, and plants bring warmth and texture to your photos. A wooden background or a potted plant can make your product look cozy. Emily Henderson, a famous interior designer

Some top natural elements for styling include:
- Reclaimed wood
- Marble or stone
- Greenery or plants
- Seashells or pebbles
Textiles: Fabrics and Backdrops
Fabrics and backdrops add color, texture, and depth to your photos. Luxurious fabrics and unique backdrops can make your product stand out. A study found that using textiles can boost consumer engagement by up to 25%.
Some favorite textiles for styling are:
- Velvet or satin fabrics
- Linen or cotton backdrops
- Patterned or textured fabrics
- Sequined or embellished textiles
Functional Props: Tools and Devices
Tools and devices add context and meaning to your photos. For example, showing a kitchen gadget with utensils or ingredients tells a story. A prop styling expert says using these props makes your product more relatable and appealing.
Some top functional props include:
- Utensils or gadgets
- Cooking ingredients or spices
- Office supplies or stationery
- Tech devices or accessories
DIY vs. Store-Bought Props
As a product photographer, I’ve often weighed DIY versus store-bought props. The choice can greatly affect your product photography’s outcome.
Thinking about product photography tools means considering your unique style. DIY props can offer customization that store-bought ones might not.
When to Go Handmade
Making your own props can be rewarding. It lets you tailor them to your specific needs. For example, if you’re shooting artisanal products, handmade props can make your images more authentic.
To make effective DIY props, think about using materials you already have. Or find unique items at local markets or thrift stores. This approach adds a personal touch and can save money.
Creating Unique and Personal Touches
DIY props let you add unique and personal touches that show your brand’s identity. By making props that match your brand’s look, you can tell a cohesive story through your images.
For instance, if your brand is about sustainability, use props made from recycled or eco-friendly materials. This boosts your brand’s message and adds depth to your product photography.
Finding Quality Store-Bought Options
While DIY props are customizable, sometimes store-bought ones are more practical. It’s key to know where to find good props. Look for stores that focus on photography props or online marketplaces with a wide selection.
When picking store-bought props, look at the material, durability, and how they fit your brand’s style. Reading reviews or asking other photographers for advice can help you choose the right props for your photography.
How to Arrange Your Props
To make your product photos look great, it’s key to know how to arrange your props. The way you set up your styling accessories and photography props can really make your product images pop. Here, I’ll give you some tips on how to arrange your props to make your product photos stand out.
Layering for Depth and Interest
Layering is a great way to add depth and interest to your photos. By layering different elements, you can create a beautiful composition that catches the eye. Start with your product on a base layer, like a tablecloth or backdrop. Then, add more layers around it with props like vases, books, or decorative items.
Tips for Effective Layering:
- Start with a simple base layer and build upon it.
- Mix different textures and heights to add visual interest.
- Ensure that your product remains the focal point.
Balancing Colors and Textures
It’s important to balance colors and textures for a harmonious look. When picking props, think about their color and texture against your product. Use a color wheel to find colors that complement your product well.
For example, if your product is very colorful, choose props with neutral tones to avoid too much. If your product is neutral, bold or brightly colored props can create a nice contrast.
| Prop Type | Color | Texture |
|---|---|---|
| Backdrop | Neutral | Smooth |
| Vase | Complementary | Glossy |
| Books | Earth Tones | Matte |
By carefully arranging your props and thinking about layering, color, and texture, you can make product photos that are not just pretty but also grab the viewer’s attention.
Lighting Tips for Styling
The right lighting can make your product photos stand out. It turns ordinary images into eye-catching visuals that attract customers. Lighting is key to the look of your product photos.
Lighting plays a big role in making your products look good. The right light can highlight your product’s best features. This makes your photos more engaging and inviting.
Natural Light vs. Artificial Light
Choosing between natural and artificial light is a big decision. Both have their good and bad points.
Natural light is often the best for photos because it’s soft and diffused. It helps avoid harsh shadows. But, it can change with the weather and time of day.
Artificial light gives you more control over your photos. You can adjust it to fit your product’s needs. It works the same every time, no matter the weather.
| Lighting Type | Advantages | Disadvantages |
|---|---|---|
| Natural Light | Soft, diffused light; reduces harsh shadows | Unpredictable; dependent on time and weather |
| Artificial Light | Controlled environment; consistent results | Can be harsh if not diffused; requires equipment |
Setting the Mood with Lighting
Lighting does more than just light up your product. It sets the mood and atmosphere of your photos. Different lights can make your photos feel different.
Warm lighting can make your photos feel cozy and inviting. Cool lighting can make them look modern and sleek. Try different lights to find the right mood for your photos.

Understanding how lighting affects your photos is key. By trying out different lighting setups, you can make your product photos more appealing. This will grab the attention of your audience.
Trends in Product Styling
In product styling, trends are more than just following the crowd. They help tell a story through your photos. Currently, two big trends stand out: minimalism and bold colors.
Minimalism: Less is More
Minimalism focuses on simplicity. It lets the product shine without extra props. I choose clean lines, simple backdrops, and a few colors for this style.
This makes the product look elegant and sophisticated. By picking the right styling props for photoshoot, I highlight the product’s features without too much clutter.
Bold Colors: Making a Statement
Bold colors grab attention and make a statement. Vibrant creative styling props add color to your images. They create a nice contrast with the product.
When using bold colors, balance them with neutral elements. This balance is key to a visually appealing image that draws you in.
Understanding and using these trends can improve your product photography. It makes your products more relatable and appealing to your audience.
Mistakes to Avoid with Props
Effective product display props can really boost your brand. But, there are common mistakes to watch out for. When styling with props, it’s easy to go too far and mess up your product’s message.
Overcrowding the Frame
One big mistake is putting too many props in the frame. This makes your product look messy and hard to see. To fix this, stick to only the props that really matter and match your product.
For more tips on picking the right props, check out this guide on choosing props for product photography.
Ignoring Your Brand Message
Another big mistake is not thinking about your brand message when picking props. Your props should show off your brand’s look and values. Make sure your props match your brand’s style to tell a clear story.
Here’s a comparison of common mistakes and their solutions:
| Mistake | Solution |
|---|---|
| Overcrowding the frame | Limit props to essentials |
| Ignoring brand message | Align props with brand aesthetic |
By avoiding these mistakes, you can use props to make your product stand out and show off your brand.
Storytelling Through Props
In product photography, props are more than just extras. They are the key to telling a story that connects with your audience. By choosing and arranging photography props and styling accessories wisely, you can make your brand stand out and grab the attention of customers.
Creating a Narrative for Your Product
To tell a compelling story, you must know what your product is all about and the message you want to share. Pick props that match your product and add to the story. For example, a luxury watch might be paired with a fancy wallet, a classic car, or a vintage book to show off its elegance.
It’s important to have a visual language that links your product to the story. Think about the colors, textures, and themes that fit your brand and product.

Evoking Emotion in Your Photos
Props can also stir emotions in your audience, making your product more appealing. Using natural elements like flowers or wood can bring a cozy feel. Sleek, modern props, on the other hand, suggest innovation and the future.
Creating an emotional bond with your audience can greatly influence how they interact with your brand. By choosing props that match your audience’s values and dreams, you can build a stronger connection and boost sales.
| Prop Type | Emotional Impact | Example |
|---|---|---|
| Natural Elements | Warmth, Cozy, Organic | Wood, Stone, Plants |
| Modern Props | Innovative, Futuristic, Sleek | Metal, Glass, Minimalist Designs |
| Vintage Items | Nostalgic, Classic, Timeless | Antique Furniture, Vintage Clothing |
By knowing how different props affect emotions and using them in your photos, you can craft a story that speaks to your audience. This can make your brand unique and memorable.
Editing After Styling
Editing is where the magic happens, turning your styled product photos into stunning visuals. Styling is just the start; the real magic is in editing. With the right tools and techniques, you can take your product photography to new heights.
Editing is not just about fixing flaws but also about making your image look better. This is where product photography tools are key. Software like Adobe Lightroom and Photoshop have many features to refine your images.
Enhancing Images with Software Tools
The right software can greatly enhance your images. Adjusting exposure and contrast can make a big difference. As Helen Berman, a famous photographer, said, “The right editing can turn a good photo into a great one.”
Look for these features in editing software:
- Color correction tools
- Noise reduction capabilities
- Advanced retouching options
Using these features ensures your product photos look great and match your brand.
Maintaining Authenticity in Post-production
Editing is key, but keeping your product authentic is just as important. Over-editing can make your product look unrealistic, which might disappoint customers. It’s all about finding the right balance.
To keep your product authentic, follow these tips:
- Be subtle with your edits; avoid over-manipulating the image.
- Ensure that the final image remains true to the product’s actual appearance.
- Use editing to enhance, not to deceive.
By following these guidelines, you can create stunning and honest product photos.
“The goal of editing is not to alter the product but to present it in the best possible light.”
Showcasing Your Styled Products
After styling your products with the right props, it’s time to show them off. This means more than just posting a photo. It’s about telling a visual story that grabs your audience’s attention.
First, think about where you’ll share your styled products. Social media is great for this, with Instagram and Pinterest being top choices for visual content.
Social Media Best Practices
When posting on social media, keep a few things in mind. Make sure your images are high-quality and well-lit. This will make your products look good and leave a strong impression.
- Use relevant hashtags to increase visibility.
- Engage with your audience by responding to comments and messages.
- Post consistently to maintain a strong brand presence.
Leveraging Influencers and Collaboration
Collaborating with influencers or other brands is another great way to showcase your products. It can help you reach more people and build your brand’s credibility.
When choosing influencers, pick those who share your brand’s values and style. Influencer marketing can really help promote your products and create excitement around your brand.
To get the most out of collaborations, consider these tips:
- Clearly define the terms of your collaboration.
- Ensure that the influencer’s audience aligns with your target market.
- Monitor the performance of your collaboration and adjust as needed.
By showing off your styled products well on social media and through smart collaborations, you can boost your brand’s visibility and sales. Always stay true to your brand’s look and message when using creative styling props and showing off your products.
The Impact of Styled Photos on Sales
Styled product photos can really boost sales. By using the right props, businesses can make their products stand out. This grabs customers’ attention and helps drive sales.
Conversion Rate Insights
Studies show that high-quality, styled images can increase sales by up to 10%. These photos create an emotional bond with customers. This makes them more likely to buy the product.
Successful Campaigns
Many brands have seen great results with styled images. For example, IKEA and West Elm use props to show how products fit into a lifestyle. This approach has led to more sales and stronger brand connections.