


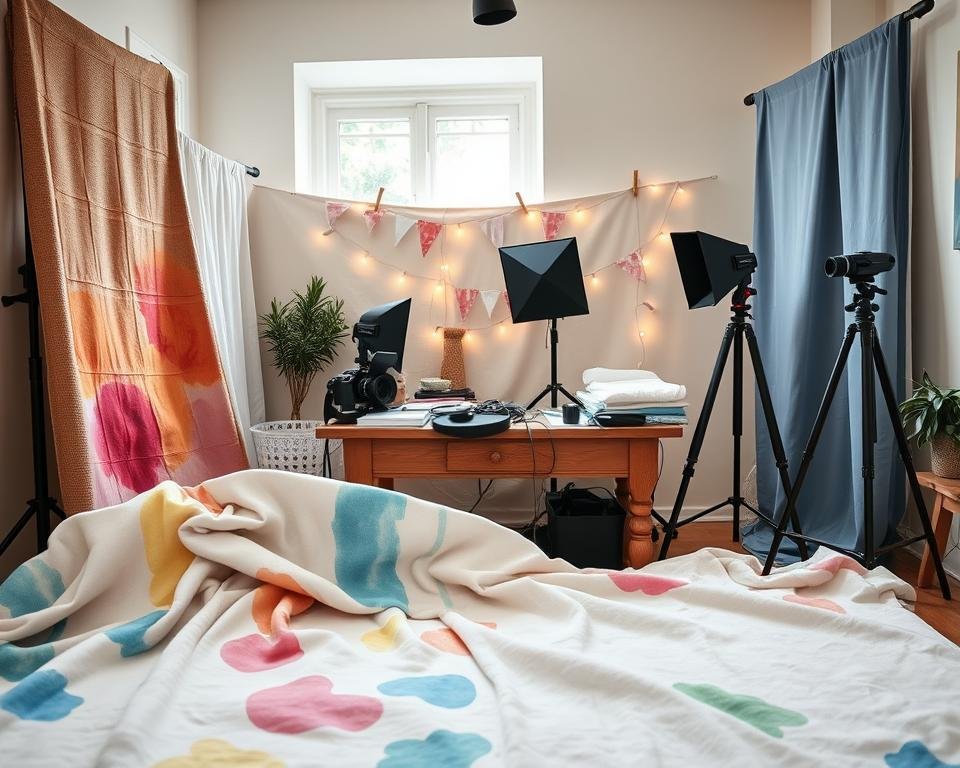
Did you know that renting a high-end studio in the United States can cost over $2,000 a day? This is a huge expense for those who just want to take a stunning photo or a clean product shot. As someone who loves photography, I’ve learned you don’t need a big budget to get amazing results.
I’ve always been amazed at how changing the scene can change the mood of a photo. By making your own DIY photography backgrounds, you can add a personal touch that makes your work unique. My aim is to show you how to create professional settings at home easily.
With affordable materials and a bit of creativity, anyone can make homemade backdrops. I’ll share my top tips to help you improve your visual storytelling and save money. Let’s see how these custom sets can be the perfect backdrop for your next creative project.
Key Takeaways
- Save a lot of money compared to expensive studio rentals.
- Customize your visual style for unique personal branding.
- Use simple, everyday household items to create art.
- Achieve high-end results without a massive production budget.
- Express your unique creativity in every single shot.
- Learn easy techniques to elevate your visual storytelling.
Why Choose Homemade Backdrops?
Homemade backdrops add a personal touch to your photos, making each one special. As a photographer, customizing your backdrop can make your work stand out. The endless possibilities make the process fun and rewarding.
Customize to Your Style
Homemade backdrops let you tailor them to your style or project theme. You can choose from minimalist to vibrant, eclectic looks. As Ansel Adams said,
“You don’t take a photograph, you make it.”
With homemade backdrops, you’re creating an experience, not just taking a photo.
Cost-Effective Solutions
Making your own backdrops can save you money. Use materials you have or find affordable supplies. This way, you get high-quality backdrops without spending a lot. A handmade backdrop can be stunning, and it’s much cheaper.
Unleash Your Creativity
Making your own backdrops is a creative journey. You can try different materials and designs. It’s fulfilling, whether you’re experienced or new to photography. Exploring handmade backdrop ideas and creative backdrop designs will elevate your photos.
Essential Materials for DIY Backdrops
The materials you pick for your DIY backdrop really matter. They can change how your photos look. Choosing the right ones is key to getting the look you want.
Looking at homemade photo backdrops, picking the material is a big deal. The texture, color, and how long it lasts all play a part in the final look.
Fabric Options
Fabric is a top pick for DIY backdrops because it’s easy to work with. Muslin fabric is a favorite because it’s cheap and comes in many sizes. You can also use cotton, canvas, and velvet for different looks.
“Fabric backdrops can add a soft, romantic touch to your photos,” says a famous photographer. “They’re great for portraits and make the scene feel warm and welcoming.”
Paper and Cardstock Choices
Paper and cardstock are also popular for custom DIY backdrops. They come in many textures and colors and can be decorated with paint, markers, or prints. Paper backdrops give a sharp look, and you can change them easily.
- Cardstock is strong and good for detailed designs.
- Paper rolls come in different sizes for seamless backdrops.
Natural Elements
Adding natural things to your backdrop can make your photos unique. You can use leaves, branches, flowers, and stones for a natural look. Think about the mood you want in your photos when using these elements.
As Annie Leibovitz said, “The most important thing in photography is to be able to see.” Natural elements can help you see and capture new things.
Step-by-Step Guide to Making a Fabric Backdrop
Creating a professional-looking fabric backdrop at home is easy with basic materials and planning. This guide will show you how, from picking the right fabric to setting it up.
Choosing the Right Fabric
Choosing the right fabric is the first step. Think about the theme, color, and texture you want. Muslin fabric is a good choice because it’s versatile and affordable. You can also pick cotton, velvet, or any other fabric that fits your needs.
Consider the lighting in your photography area. Some fabrics might need extra lighting or diffusers. Also, make sure the fabric is big enough for your backdrop area.
Preparing Your Workspace
Before starting, get your workspace ready. Find a large, flat area for your fabric. If it’s new, wash and iron it to remove finishes that could affect the look.
Use clamps or weights to keep the fabric steady. This makes your work smoother and faster.
Installation Tips
When your backdrop is ready, it’s time to set it up. Use a strong stand or frame to hold the fabric. Make sure the stand can adjust for different heights and angles.
To get a smooth surface, use a steamer to remove wrinkles. You can also use clips or clamps to keep the fabric tight and even.
By following these steps, you can make a beautiful, professional-looking fabric backdrop. With practice, you can try different fabrics, colors, and textures for unique backdrops in your photos.
Creating a Seamless Paper Backdrop
Make your photos better with a DIY paper backdrop. It’s affordable and you can make it your own. Many photographers like them because they’re easy to use and versatile.
Selecting the Perfect Paper
Choosing the right paper is important. Think about the texture, how durable it is, and how it looks. These things will help you pick the perfect paper for your backdrop.
Key considerations:
- Weight: Heavier papers are more durable and less prone to wrinkles.
- Texture: Smooth papers give a clean look, while textured papers add depth.
- Color: Pick a color that goes well with your subject and style.
Techniques for Smooth Application
To get a smooth paper backdrop, apply the paper evenly. Here are some tips to help:
Tips for a smooth application:
- Use a large, flat surface to lay out your paper.
- Apply a small amount of adhesive to the back of the paper to secure it in place.
- Smooth out any air bubbles or wrinkles using a credit card or similar tool.

Storage and Reuse Ideas
To keep your paper backdrop in good shape, store it right. Here are some ideas for storing and reusing your backdrop:
| Storage Method | Benefits |
|---|---|
| Rolling and storing in a tube | Prevents creases and damage |
| Folding and storing in a flat container | Easy to transport and store |
| Using a paper backdrop stand | Allows for easy setup and takedown |
Using Natural Elements as Backdrops
For photographers looking for homemade backdrop inspiration, nature is full of colors and textures. Using natural elements as backdrops is both affordable and adds a unique, organic feel to your photos.
Nature has many elements for creating stunning backdrops. From the bright colors of flowers and plants to the rustic beauty of outdoor spots, the options are endless.
Incorporating Flowers and Plants
Using flowers and plants as backdrops is a beautiful idea. Whether it’s a field of wildflowers, a lush garden, or a simple bouquet, they can add color and texture to your photos.
- Choose seasonal flowers for the most vibrant colors.
- Consider the texture and shape of the plants to add depth.
- Experiment with different arrangements to find the perfect backdrop.
Finding Unique Outdoor Locations
The outdoors is full of unique spots for backdrops. From beaches to forests, and from mountains to deserts, each place has its own look and feel.
When looking for outdoor spots, think about the lighting. Early morning and late afternoon are great for soft, warm light.
Seasonal Considerations
When using natural elements as backdrops, think about the season. Each season brings its own opportunities and challenges.
- Spring: Take advantage of blooming flowers and greenery.
- Summer: Use the lush foliage and vibrant colors.
- Autumn: Capture the warm tones of changing leaves.
- Winter: Embrace the stark beauty of snow-covered landscapes.
By keeping an eye on the season, your natural backdrops will stay fresh and relevant all year.
Painting Your Own Backdrop
Painting your own backdrop is a fun DIY project. It lets you customize it in many ways. You can play with colors and textures to make it unique.
“The right backdrop can elevate your photography to the next level,” many pros say. Painting your own lets you pick colors and designs that match your subject perfectly.
Choosing the Right Colors
Think about the mood you want for your backdrop. Soft pastels can be calming, while bold colors add energy. Consider how the colors will look with your subject’s clothes and the overall look you want.
Start with a color wheel to find good color pairs. Look at nature, art, or interior design for ideas. The goal is to make the backdrop enhance your subject without taking over.

Techniques for Texture
Texture can make your backdrop more interesting. You can use sponging, ragging, and stenciling to add texture. Each method can give you different effects, from soft to bold.
Sponging gives a soft, mottled look, while ragging makes it more rustic. Try different tools and techniques to find the right texture for your backdrop.
Safety Tips When Using Paint
When painting, safety comes first. Work in a well-ventilated area to avoid fumes. Wear a mask if the paint smells strong or is toxic.
Also, follow the paint’s instructions carefully. This includes how to apply it, drying times, and what protective gear you need. These steps help you stay safe and have fun making your backdrop.
Incorporating Props with Your Backdrops
Boost your photography skills by using props that match yourcreative backdrop designs. Adding props to my homemade backdrops makes my photos look better.
Props can be simple, like flowers or books, or more complex, like vintage furniture. The important thing is to pick props that fit your backdrop and add something special to your photo.
Enhancing Visual Interest
To make your photos more interesting, choose props with different textures, colors, and shapes. For example, a smooth fabric backdrop looks great with a rustic wooden prop.
Texture is key for depth in your images. Mixing textures makes your photos lively and interesting.
Choosing Coordinating Props
Think about the theme and mood you want in your photo when picking props. Choose props that match your backdrop in color and style for a unified look.
| Backdrop Type | Prop Suggestions |
|---|---|
| Floral | Vintage garden tools, floral crowns |
| Urban | Industrial items, city maps |
| Minimalist | Simple geometric shapes, monochrome objects |
Tips for Arrangement
Arranging props well is key for a balanced photo. Start simple and add more elements until it looks right.
Remember, props should enhance your subject, not take over. Keep them balanced and make sure they match your homemade photo backdrops.
Color Theory for Backdrops
Color theory is key in making homemade backdrops that boost your photos. Knowing how colors interact is essential for a great image.
Colors can stir emotions and send messages, changing a photo’s mood. By using color theory, you can make backdrops that match your subject and tell your story better.
Understanding Color Combinations
Color theory starts with knowing how colors mix. There are many color combos used in photos:
- Monochromatic: Using different shades of one color for a unified look.
- Complementary: Pairing colors opposite each other on the color wheel for contrast.
- Analogous: Using colors next to each other on the color wheel for harmony.
Trying out these combos can help you find the right backdrop. For example, monochromatic looks clean, while complementary adds interest.

Matching Backdrops with Subjects
Choosing a backdrop means thinking about your subject’s color and tone. The backdrop should match the subject without taking over. For instance, a bright subject looks good with a neutral backdrop.
On the other hand, a subject in neutral tones can pop against a bold backdrop. Knowing how your subject’s color interacts with the backdrop is vital for a great photo.
Psychology of Color in Photography
Colors can stir emotions and send messages. In photos, the backdrop’s color can change the mood. For example:
- Red means passion, energy, and love.
- Blue is calm, trustworthy, and serene.
- Green is about nature, growth, and harmony.
Understanding color psychology helps you make backdrops that look good and feel right. This way, your photos can be stunning and emotionally powerful.
By using color theory in your DIY backdrop project, you can improve your photos. Your images will be not just beautiful but also emotionally engaging.
Lighting Considerations for Backdrops
The right lighting can make your photos stand out. When paired with a homemade backdrop, it can create amazing results. Lighting is key in photography, affecting how your photos look and feel.
Working with homemade backdrops means learning to control light. You can use natural or artificial light. The goal is to make sure it works well with your backdrop and subject.
Natural vs. Artificial Lighting
Natural light is often the most flattering. It’s great for outdoor photos. But, it can change with the time of day and weather.
Artificial lighting, on the other hand, lets you control the light. It’s perfect for indoor shots or when you need consistent lighting.
Key differences between natural and artificial lighting:
| Lighting Type | Characteristics | Best Use |
|---|---|---|
| Natural Light | Soft, warm, and variable | Outdoor photography, portraits |
| Artificial Light | Controlled, consistent, and adjustable | Indoor photography, product photography |
Setting Up Your Lighting
Setting up your lighting depends on your backdrop and the look you want. Start with one light source. Move it to avoid harsh shadows and highlights.
Tips for setting up your lighting:
- Try different light positions to find the best angle.
- Use diffusers or softboxes to soften the light and reduce harsh shadows.
- Adjust the light’s intensity to match your mood.
Adjusting for Different Backdrop Materials
Backdrops react differently to light. Fabric can absorb or reflect light, while paper might cause glare.
To adjust for different materials, consider these tips:
- For fabric, use soft light to hide wrinkles and texture.
- For paper, position your light to avoid glare and reflections.
- For natural elements, mix natural and artificial light to enhance textures and colors.
Understanding lighting and backdrop materials can lead to stunning photos. Whether you’re new or experienced, mastering lighting is key to improving your photography.
Troubleshooting Common Issues
Starting with DIY photography can lead to a few common problems. Issues like wrinkles, bumps, lighting challenges, and color mismatches can pop up. I’ll share solutions to help you get professional-looking photos with your DIY backdrops.
Wrinkles and Bumps in Fabric
Wrinkles and bumps in fabric can ruin your photos. To fix this, prepare and install your fabric right.
- Ironing the fabric before use can help remove wrinkles.
- Using a steamer can also be effective for relaxing wrinkles without scorching the fabric.
- Ensuring the fabric is tightly secured to the backdrop stand or frame can prevent bumps and sagging.
Lighting Challenges
Lighting greatly affects your homemade backdrops. Uneven lighting, harsh shadows, and reflections can be fixed with the right methods.
Natural vs. Artificial Lighting: Knowing the difference between natural and artificial light is key. Natural light is soft, while artificial light needs diffusers or softboxes for a similar look.
Color Mismatches
Color mismatches between your backdrop and subject can be jarring. To avoid this, use color theory principles.
Here’s a quick comparison of common issues and their solutions:
| Issue | Solution |
|---|---|
| Wrinkles in fabric | Iron or steam the fabric |
| Lighting challenges | Use diffusers or adjust lighting setup |
| Color mismatches | Apply color theory principles |
By tackling these common issues, you can greatly improve your DIY photography backgrounds. This will help you achieve professional results.
Tips for Showcasing Your Backdrops
Now that you’ve made your handmade backdrop ideas, it’s time to show them off. With a bit of creativity, you can make your DIY backdrops into amazing photography spots. They will capture the true essence of your subjects.
Capturing the Perfect Shot
To get stunning photos, try different angles and lighting setups. Check out Artifact Uprising for more at-home photoshoot ideas. They include creative backdrop designs.
Portfolio Perfection
When you put your work in a portfolio, pick your best images. Make sure they show off your handmade backdrop ideas well. Also, keep the images organized and easy to find.
Social Media Strategies
To get your work seen on social media, share behind-the-scenes stuff. Use the right hashtags to get more views. This way, you’ll reach more people and get noticed for your photography.